
A Guide to Handling, Preparing, Building, Painting and Caring for Your Model
One of the great advantages of modern high-resolution resin printing is the extraordinary level of detail that can be reproduced in a relatively small model. Rivets, bolt heads, pipework, brake gear, timber grain, tiny brackets, hinges and other details that would once have been extremely difficult to reproduce can now be incorporated directly into a model.
That detail does, however, mean that a resin model should be treated a little differently from a conventional injection-moulded plastic kit.
At Shoreleave Models we carry out the main resin post-processing before a model leaves us. You are not receiving a freshly printed model covered in uncured liquid resin and you should not need to perform the washing and UV-curing process yourself.
Every production model goes through a multi-stage post-processing procedure designed to remove residual uncured resin, properly cure the model and prepare it for handling, construction and painting.
Even after this process, resin remains a specialist modelling material. It can produce exceptional detail, but very fine components can be more brittle than their equivalent in flexible injection-moulded plastic.
A little care goes a long way.
What Happens Before Your Model Leaves Shoreleave Models?
When a resin printer finishes a model, the object that comes off the build plate is not yet a finished product.
The printing process uses a liquid photopolymer resin which is selectively hardened by ultraviolet light inside the printer. Although the model itself has been formed, freshly printed parts can still have a film of uncured resin on their surfaces and inside recesses.
For that reason, every model must go through a controlled post-processing procedure.
Our normal workflow involves several stages.
1. Removal From the Printer
Once printing is complete, the build plate is removed and the models are allowed to drain.
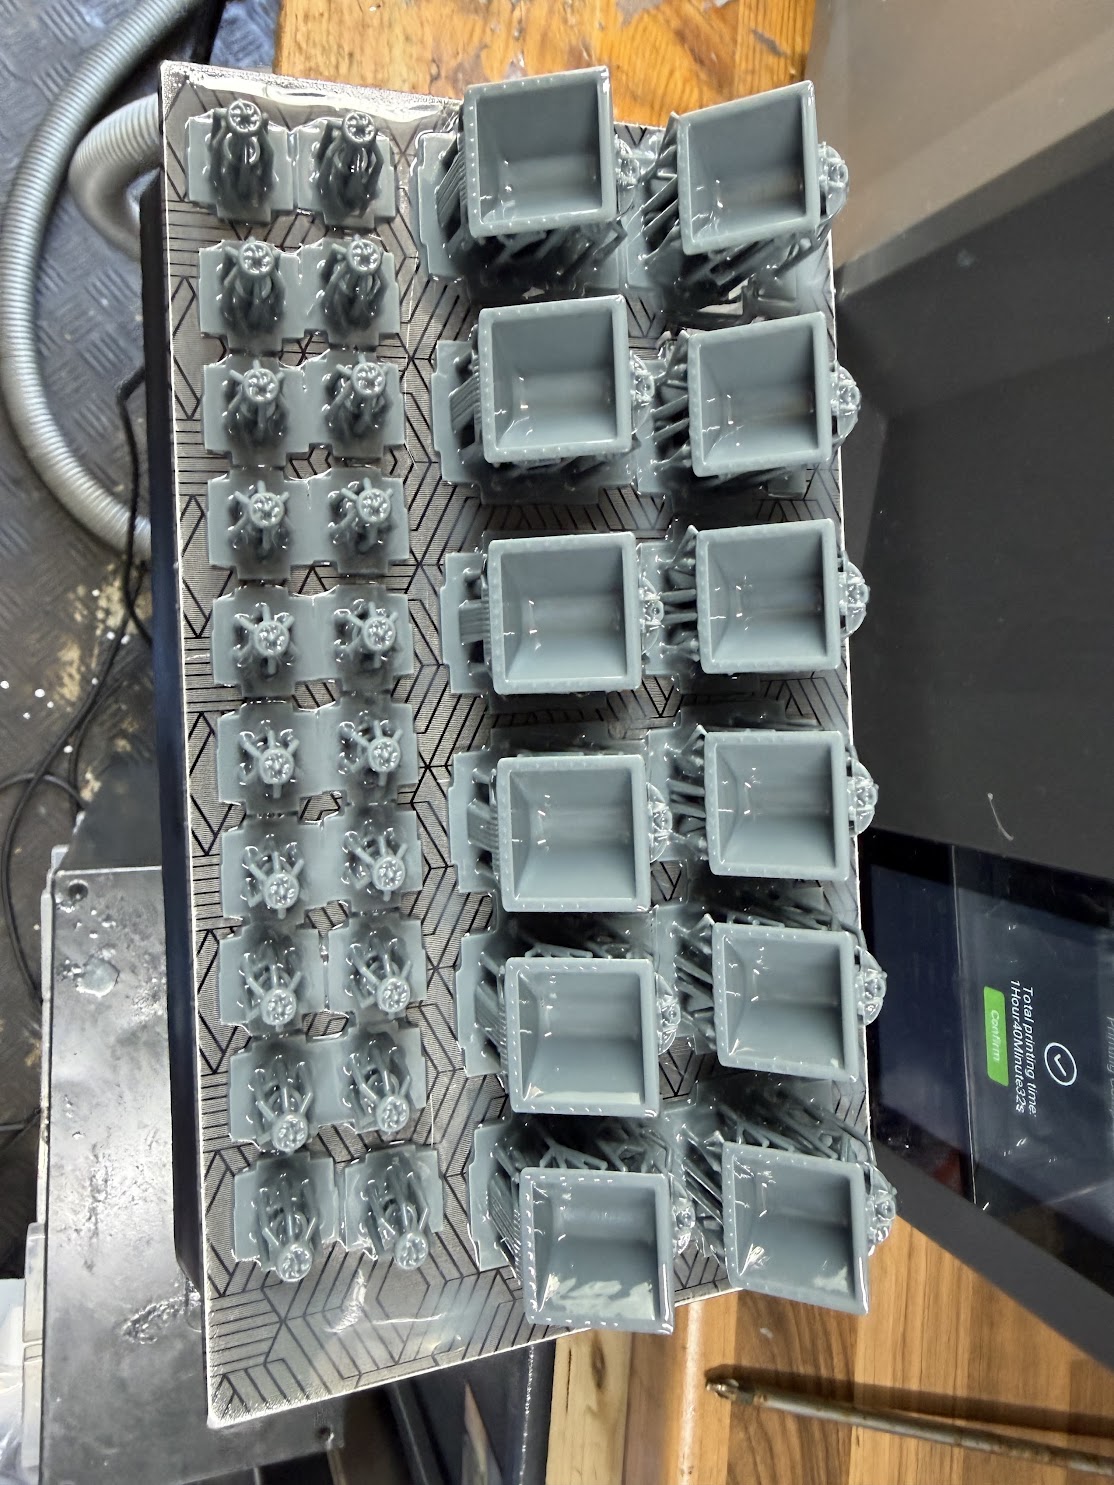
At this stage the model is considered an unfinished resin print.
There may still be uncured liquid resin:
- on external surfaces;
- inside small recesses;
- around rivets and raised details;
- between closely spaced components;
- inside hollow sections;
- around support structures;
- beneath overhangs;
- and within other areas where liquid resin can collect.
This is one of the reasons we do not simply remove a print from the machine, clip off the supports and put it in a box.
Post-processing is an important part of producing the finished model.
2. Initial IPA Cleaning
The first cleaning stage removes the majority of the liquid resin remaining on the print.
The models are washed using isopropyl alcohol — commonly known as IPA.
IPA dissolves and carries away uncured photopolymer resin from the surface of the print.
A first wash removes the bulk contamination, but one wash alone can sometimes leave behind a microscopic film of resin diluted in the alcohol. As the alcohol evaporates, that resin can remain on the model.
For this reason, multi-stage washing is widely used in professional resin-printing workflows. A cleaner secondary bath helps remove residue left by the primary wash.
3. Secondary Cleaning
Our models therefore undergo further cleaning rather than relying entirely on a single wash.
The purpose of the subsequent cleaning stages is to reach areas that may retain traces of resin and to reduce contamination from the first IPA bath.
This is particularly important with detailed models.
A simple block-shaped object is comparatively easy to wash. A narrow-gauge locomotive can contain:
- riveted frames;
- axle boxes;
- brake components;
- pipework;
- cab interiors;
- boiler fittings;
- small brackets;
- recesses;
- bolt detail;
- chain detail;
- underframes;
- buffer beams;
- mechanical components;
- and numerous other small features.
Each of those details can potentially trap a small amount of resin during printing.
The purpose of our cleaning process is to remove as much of that residue as practicable before curing.
4. Drying
After the cleaning stages, the model is allowed to dry.
This step is more important than it might initially appear.
IPA should be allowed to evaporate before final UV post-curing. Manufacturer guidance similarly recommends allowing washed resin parts to dry completely before post-curing.
We therefore do not intentionally place models directly from a wet IPA bath into their final curing stage.
The model is given time to dry so that cleaning solvent does not remain trapped unnecessarily in surface recesses.
5. Support Removal and Finishing
Resin models are normally printed using temporary support structures.
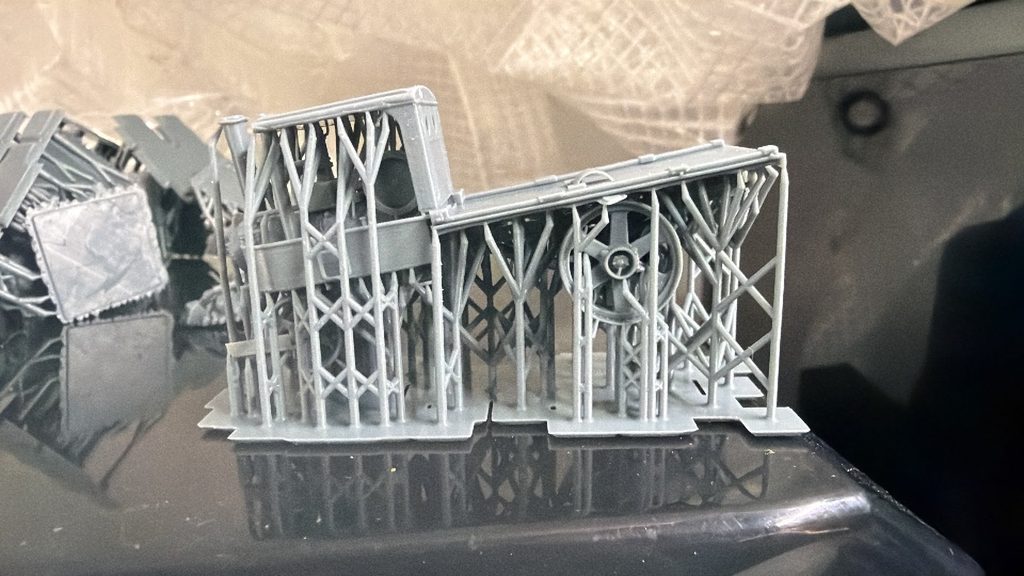
These supports hold the model in the correct orientation while thousands of individual resin layers are produced.
Once the print has been successfully completed, these supports are removed.
Depending upon the shape and construction of a particular model, some support contact points may require additional cleaning or finishing.
We make every reasonable effort to place supports in locations that minimise their effect on visible surfaces.
However, resin printing is still an additive manufacturing process and tiny support witness marks can occasionally remain.
These are not normally defects.
They are the resin-printing equivalent of the small sprue attachment points found on traditional plastic kits and can generally be removed with:
- a fine sanding stick;
- fine abrasive paper;
- a small needle file;
- a sharp modelling blade;
- or a combination of these.
Always remove material gradually.
With resin, ten gentle passes with a sanding stick are considerably safer than one aggressive pass with a large file.
6. UV Post-Curing
Cleaning removes the liquid resin surrounding the model, but the printed material must also be properly post-cured.
The cleaned and fully dried models therefore undergo controlled exposure to ultraviolet light.
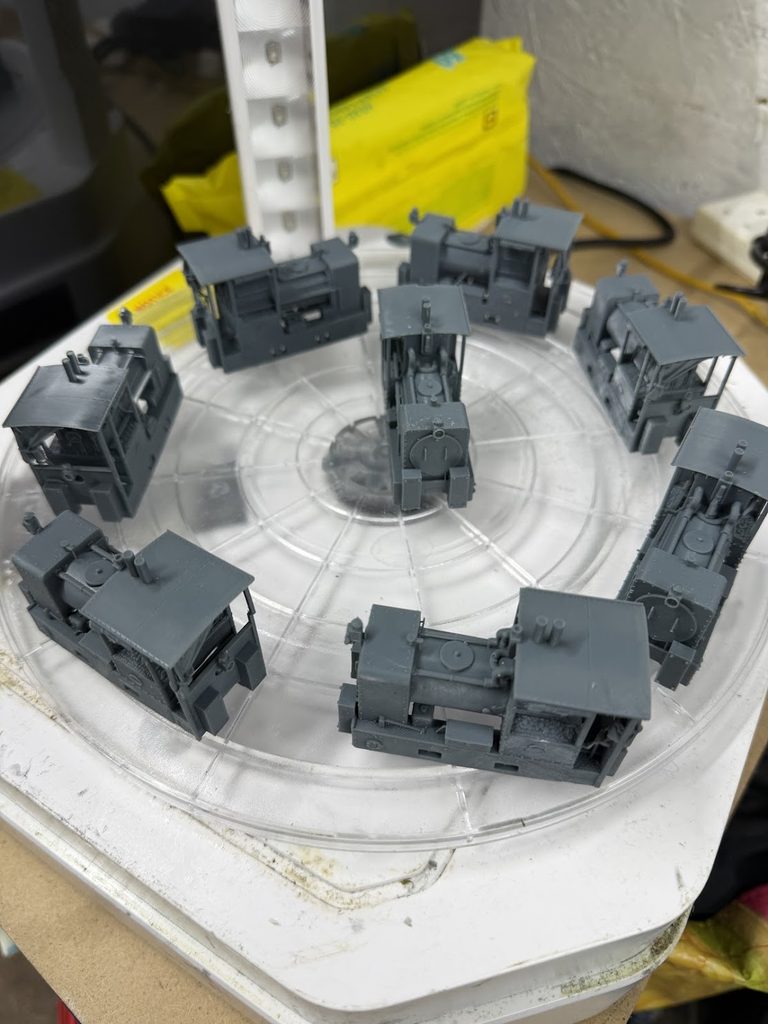
This further polymerises the resin and develops the properties of the finished material.
UV post-curing helps produce a stable model suitable for normal modelling, handling, assembly and painting.
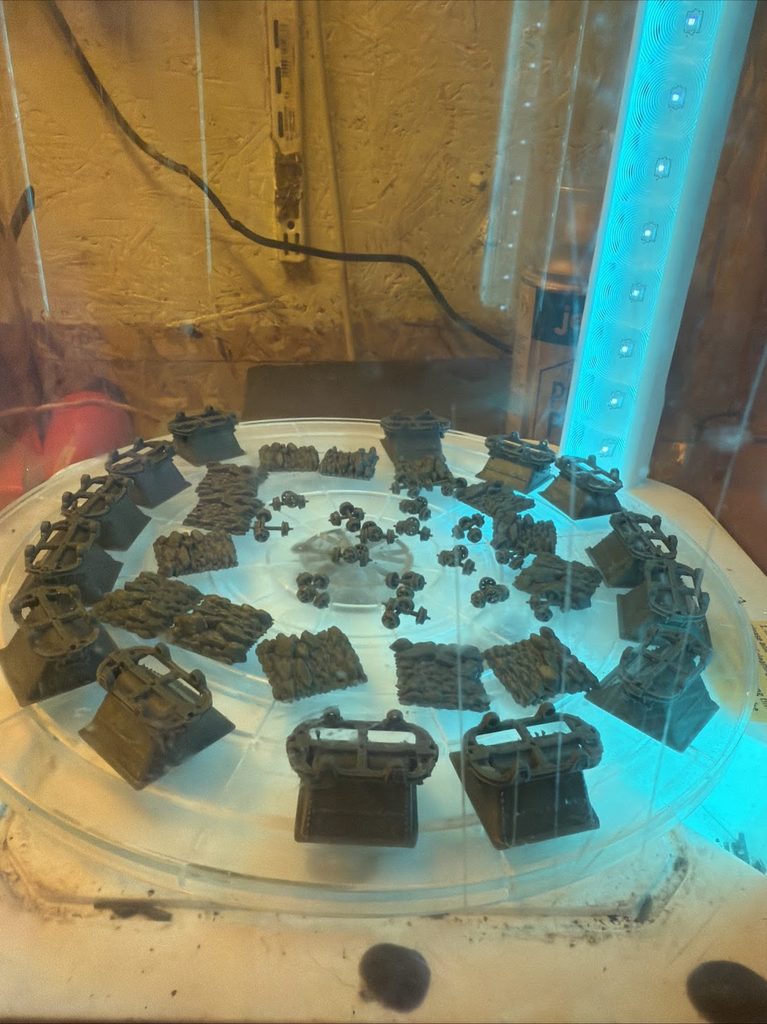
This is an important distinction between the models we send to customers and something that has simply been removed from a resin printer.
Shoreleave Models are supplied washed and post-cured.
You should not normally need to purchase a UV curing station or expose your model to additional UV simply because it is resin printed.
7. Final Inspection
Following cleaning and curing, models are inspected before packing.
We are looking for issues such as:
- incomplete printing;
- missing sections;
- significant print defects;
- damaged components;
- remaining support structures;
- obvious surface contamination;
- deformation;
- and other problems that would make the model unsuitable for supply.
It is worth remembering that these are extremely detailed, small-scale models produced using additive manufacturing.
Under very close magnification you may occasionally see extremely fine layer lines or small support witness marks.
These are normal characteristics of the manufacturing process and will usually disappear completely under primer and paint.
8. Protection and Packing
Once processing and inspection are complete, the model is prepared for shipment.
Particular attention is paid to protecting fine components.
It is often tempting to judge a resin model by its overall size. A locomotive body may appear quite substantial, but a handrail, brake lever, chimney fitting or pipe attached to it may only be a fraction of a millimetre thick.
Our packaging is therefore intended not simply to stop the model moving around inside the parcel, but to protect vulnerable features while the parcel passes through the postal system.
When unpacking your model, please apply the same philosophy.
Don’t pull the model out by the first convenient projection.
Remove the packaging around the model and lift the main body of the model itself.
Your Model Has Arrived — What Should You Do?
In most cases:
Very little.
Your Shoreleave Models resin print has already been washed, dried and UV post-cured.
There is no requirement to put the model in IPA.
There is no requirement to UV cure it again.
There is no requirement to scrub it aggressively.
There is no requirement to undertake the type of chemical post-processing associated with a freshly printed resin component.
You can normally move directly into inspection, minor preparation, assembly, priming and painting.
Do I Need to Wash the Model Again?
Generally, no.
We specifically recommend against automatically soaking your finished model in IPA simply because you have read that resin prints need to be washed.
That advice normally refers to freshly printed resin parts.
Your Shoreleave model has already been through that process.
Excessively long exposure to IPA can adversely affect some photopolymer resins, and manufacturers specifically warn against unnecessarily prolonged washing.
If you want to remove fingerprints, workshop dust or residue immediately before painting, a much gentler approach is normally sufficient.
A brief wash using:
lukewarm water and a small amount of mild dishwashing detergent
is generally all that is required.
Use a soft brush only if necessary.
Rinse the model and allow it to dry thoroughly before applying primer.
Avoid extremely hot water.
Should I Wear Gloves When Handling It?
For normal handling of a properly cleaned and fully cured Shoreleave model, the situation is very different from handling liquid printing resin.
NIOSH notes that once curing is complete, surface resin is usually fully cured and the risk associated with skin exposure is significantly reduced compared with uncured resin.
You therefore do not need to treat one of our finished models as though it is covered in hazardous liquid resin.
For normal examination and assembly, clean dry hands are generally appropriate.
However, wearing nitrile gloves can still be useful during final preparation and painting because it prevents skin oils and fingerprints from being transferred to the model.
Gloves become considerably more important if you are handling uncured liquid resin yourself, which is a completely different situation.
A Note About Resin Dust
Once you begin:
- sanding;
- filing;
- drilling;
- sawing;
- grinding;
- machining;
- or cutting resin,
you create particulate material.
This should be treated differently from simply holding a finished model.
NIOSH specifically identifies sanding as an operation capable of generating resin-containing dust.
We therefore recommend sensible workshop precautions.
Where practical, wet sanding is preferable because it dramatically reduces the amount of airborne dust.
When dry sanding or carrying out more substantial machining, work in a well-ventilated area and use appropriate eye and respiratory protection suitable for fine particulates.
Do not deliberately blow resin dust around your workshop with compressed air.
Clean the work surface afterwards.
And, as with almost any modelling material:
don’t eat the dust.
Sanding Resin
Resin sands extremely well.
In fact, one of the advantages of resin is that small print witness marks and support contact areas can normally be removed very quickly.
That also means that it is very easy to remove too much.
Start with relatively fine abrasives.
For most finishing work something in the region of:
- 400 grit;
- 600 grit;
- 800 grit;
- followed by finer grades where necessary
is normally more appropriate than attacking the model with coarse sandpaper.
For tiny areas, sanding sticks are particularly useful.
The aim is normally to remove the blemish rather than reshape the component surrounding it.
If you are sanding around rivets, bolt heads or timber texture, work carefully.
Fine detail can disappear very quickly under aggressive sanding.
Wet Sanding
Wet sanding is particularly well suited to cured resin models.
It:
- reduces airborne dust;
- prevents abrasive paper clogging;
- produces a smoother finish;
- and allows better control over the amount of material being removed.
A small container of water and a selection of fine wet-and-dry papers are often all that is required.
You do not need to submerge the entire locomotive.
Simply keeping the abrasive and working area damp is normally sufficient.
Clean the resulting slurry from the model and work area when finished.
Filing Resin
Small needle files are ideal for cleaning:
- support contact points;
- mating surfaces;
- chassis openings;
- tabs;
- slots;
- coupling mounts;
- and other areas.
Diamond files can also work very well.
Again, use light pressure.
Resin responds much better to controlled cutting than brute force.
If the file suddenly catches on a thin component, the component may fracture before the file does.
Whenever possible, support the part you are working on from behind.
Cutting Resin
A fine razor saw is generally the best option when a significant section of resin needs to be removed.
For very small features, a sharp modelling knife can be used.
However, do not attempt to force a blade through a thick resin section.
The material may suddenly fracture rather than cut cleanly.
Make several shallow passes instead.
Always cut away from yourself and use the same workshop precautions you would use for any sharp modelling tool.
Drilling Resin
Cured resin can be drilled very successfully.
This is useful for:
- handrails;
- couplings;
- pipework;
- locating pins;
- motor installations;
- chassis modifications;
- brake components;
- lamps;
- wiring;
- and detailing.
For very small holes, we strongly recommend using a pin vice rather than a powered drill.
Turn the drill slowly and allow the cutting edge to do the work.
Do not force the drill bit.
If drilling close to an edge, place your fingers or another support behind the area being drilled where possible.
This reduces the chance of the surrounding resin flexing or breaking.
Using Rotary Tools
A Dremel or similar rotary tool can be used on resin, but it should be treated with considerable respect.
High rotational speeds can:
- remove material extremely quickly;
- generate large amounts of dust;
- create localised heat;
- catch thin components;
- and turn a minor modification into a very large hole in approximately half a second.
For most OO9 modelling jobs, hand tools are considerably easier to control.
If you do use a rotary tool, use a low speed and appropriate dust precautions.
Resin Is Detailed — But It Isn’t Indestructible
This is probably the single most important thing to understand about high-resolution resin models.
A locomotive body may feel quite solid.
A 0.5 mm pipe attached to it is not.
A traditional injection-moulded component may flex when bent.
A finely printed resin component may instead remain rigid until it reaches its limit and then snap.
That is the compromise that allows us to reproduce extremely fine scale details.
Whenever possible:
hold the model by the main body, chassis, tank, boiler, cab or another substantial structural area.
Do not routinely pick the model up by:
- chimney caps;
- whistles;
- brake levers;
- handrails;
- small pipes;
- exhausts;
- cab roof details;
- steps;
- couplings;
- buffer heads;
- lamp irons;
- chains;
- valve gear;
- or other delicate projections.
This sounds obvious.
Every model maker nevertheless eventually picks up a model by exactly the part they shouldn’t.
We’ve all done it.
Dropping Resin Models
Resin models do not particularly enjoy gravity.
A fall from a layout onto carpet may result in nothing more than colourful language.
A fall from a workbench onto a hard tiled floor can be considerably more dramatic.
The main body may survive perfectly while the tiny details absorb the impact.
Whenever possible, work over a modelling mat or relatively soft surface.
This is particularly useful while handling small components.
Glue — What Should I Use?
Traditional polystyrene model cement works by chemically softening and welding polystyrene plastic.
A resin print isn’t polystyrene.
For that reason, conventional polystyrene cement is usually ineffective.
For most resin model construction we recommend:
Cyanoacrylate
Usually called:
CA glue or superglue.
This is excellent for most small resin components.
Thin CA is useful for close-fitting parts.
Medium or gel CA provides slightly more working time and can be useful where a tiny gap exists.
Don’t flood the joint.
A surprisingly small amount is usually sufficient.
Two-Part Epoxy
Epoxy adhesive is excellent where:
- additional strength is required;
- the components are relatively large;
- the fit is imperfect;
- or more positioning time is useful.
Epoxy can be particularly useful for attaching weights or substantial mechanical components.
PVA
PVA is generally unsuitable as a structural adhesive for resin-to-resin joints.
It can, however, be useful when attaching certain scenic materials to a resin model.
Gluing Small Details
Dry-fit everything first.
Check:
- orientation;
- alignment;
- clearance;
- and positioning
before introducing glue.
For extremely small components, place a drop of CA onto a scrap surface and transfer a microscopic quantity with:
- a cocktail stick;
- fine wire;
- needle;
- or specialist glue applicator.
This gives much greater control than pointing a superglue bottle directly at a 0.4 mm pipe fitting and hoping for the best.
Filling Small Imperfections
If you want to fill a tiny support witness mark, join or surface defect, several conventional modelling fillers work well.
Suitable options can include:
- fine modelling putty;
- two-part epoxy putty;
- fine surface filler;
- CA-based filling techniques;
- and other fillers designed for model making.
Apply the smallest quantity necessary.
It is considerably easier to add another layer of filler than to sand a giant mound of hardened filler from around 40 tiny rivets.
Priming Resin
We strongly recommend priming resin models before painting.
Primer serves several purposes.
It:
- provides a consistent base colour;
- improves paint adhesion;
- reveals small imperfections;
- makes support witness marks easier to see;
- and helps subsequent paint layers behave consistently.
Before priming, make sure the model is:
clean, dry and free from sanding dust.
Apply primer in thin coats.
High-resolution resin contains very small details.
Three extremely heavy coats of primer can turn beautiful rivet detail into vague little bumps.
A thin mist coat followed by one or two light covering coats usually produces a much better result.
What Primer Should I Use?
Most good-quality modelling primers intended for miniatures, plastic models or resin models will work successfully.
Acrylic primers are a straightforward option.
Many aerosol hobby primers also work well.
Automotive primers can be used by experienced modellers but are often considerably heavier and more aggressive than necessary for a small OO9 model.
Whatever product you choose:
thin coats are your friend.
If you are trying an unfamiliar solvent-based primer, test it on an inconspicuous area first.
Painting
Once properly primed, the model can normally be treated much like any other high-quality model kit.
You can use:
- acrylic paints;
- enamel modelling paints;
- airbrush paints;
- brush paints;
- washes;
- filters;
- weathering powders;
- pigments;
- dry brushing;
- chipping effects;
- and other conventional modelling techniques.
This is the point where the model really becomes yours.
We love seeing two customers take exactly the same Shoreleave locomotive and produce completely different machines from it.
One may emerge freshly painted from the works.
Another may have rust streaks, oil stains, faded paint and forty years of imaginary industrial abuse.
Both are equally valid.
Paint in Thin Layers
One of the biggest advantages of a resin print is its detail.
Don’t immediately bury that detail.
With airbrushing in particular, several thin coats are preferable to a single heavy coat.
Allow paint to build gradually.
The difference is particularly noticeable around:
- rivets;
- bolt heads;
- timber grain;
- grille openings;
- pipework;
- lettering;
- panel lines;
- and mechanical detail.
Weathering
Resin models are particularly well suited to weathering.
Industrial narrow-gauge locomotives and wagons rarely lived easy lives, so there is enormous scope for:
- rust;
- oil;
- soot;
- coal dust;
- lime;
- mud;
- faded paint;
- grease;
- mineral staining;
- chipped paint;
- and general industrial grime.
Once the model is primed and painted, weather it using whatever methods you normally use on conventional models.
A suitable protective clear coat between certain weathering stages can make experimentation much easier.
Can I Strip the Paint Later?
Possibly — but be careful.
Some paint strippers and solvents which are harmless to traditional plastic kits can attack, soften or damage photopolymer resin.
Do not assume that a solvent is safe simply because you have previously used it on polystyrene.
Avoid casually soaking the model in:
- acetone;
- cellulose thinners;
- lacquer thinner;
- aggressive industrial degreasers;
- or unknown paint-removal chemicals.
If you need to strip a model, test the chosen product on an inconspicuous area first.
Better still, use a paint remover specifically known to be compatible with cured resin models.
Avoid Long IPA Soaks
IPA is extremely useful when processing freshly printed resin.
That does not mean that keeping a finished model submerged in it for hours is beneficial.
Prolonged solvent exposure can affect some photopolymer materials.
Your model has already been cleaned.
There is normally no reason to repeat our production washing process at home.
Heat and Resin
Resin models should not be exposed to unnecessary high temperatures.
Avoid leaving an unpainted model:
- on a very hot radiator;
- directly against a heater;
- beneath a high-temperature lamp;
- inside a very hot vehicle;
- or anywhere else where significant heat may develop.
High temperature can potentially encourage deformation, particularly in thin sections.
The same principle applies to completed models.
A resin locomotive sitting happily on a layout at normal room temperature is very different from the same locomotive left on the dashboard of a closed car in direct summer sunlight.
Direct Sunlight and Long-Term UV Exposure
UV light is used to cure photopolymer resin.
However, that does not mean that unlimited long-term ultraviolet exposure is desirable.
Like many polymers, prolonged sunlight and heat can eventually contribute to changes in colour and mechanical properties.
For display models, normal indoor use is not a problem.
We simply recommend avoiding prolonged storage of bare resin models in direct sunlight.
Primer, paint and varnish also provide an additional physical barrier between the resin surface and the environment.
Straightening a Slightly Warped Component
Occasionally a very thin resin component can develop a slight distortion.
Before attempting to straighten a delicate component, consider whether it actually needs correcting.
If it does, do not immediately reach for:
- boiling water;
- a heat gun;
- a soldering iron;
- or the highest setting on a hair dryer.
Excessive heat can turn a minor problem into a significantly more interesting problem.
Controlled gentle warming can sometimes be used by experienced model makers to adjust resin components, but the appropriate technique depends on the thickness and geometry of the part.
If a significant component of a Shoreleave model appears distorted when it arrives, we would much rather you contact us before attempting major heat treatment.
Screws and Mechanical Fasteners
Some Shoreleave Models products may be intended for use with:
- motorised chassis;
- bearings;
- couplings;
- screws;
- weights;
- axles;
- brass components;
- or other mechanical parts.
Do not force oversized screws directly into a resin opening.
Where appropriate:
- check the hole size;
- open the hole carefully with a drill;
- support the surrounding material;
- insert the screw gradually;
- and stop tightening as soon as the component is secure.
Resin does not respond well to the traditional engineering technique of:
“another quarter turn just to make sure.”
Overtightening can split the surrounding material.
Chassis Fitting
If your model is designed around a commercial chassis, always test-fit the chassis before painting the interior heavily.
Small variations can occur between:
- chassis production batches;
- motor housings;
- wiring;
- solder joints;
- pickup strips;
- and customer modifications.
Never force a chassis into a resin body.
If it doesn’t fit, find the point of interference.
Remove a tiny amount of resin from that area.
Test again.
Repeat.
A gradual fit-and-test approach produces a much better result than trying to press several millimetres of metal chassis through a slightly undersized opening.
Adding Weight
Weights can usually be installed using CA or epoxy depending on their size.
Make sure that additional weight does not:
- foul the motor;
- interfere with gears;
- prevent ventilation;
- contact rotating parts;
- restrict wiring;
- or obstruct the chassis.
Also remember that adding a large lump of metal to a resin body changes the loads applied if the locomotive is dropped.
More weight is not always automatically better.
Cleaning a Finished Model
Once painted and assembled, your model should generally be treated in the same way as any other detailed model railway locomotive.
For dust:
- use a soft brush;
- photographic blower;
- or very gentle clean air.
Avoid aggressive compressed-air jets directly against delicate fittings.
If the locomotive is motorised, follow the chassis manufacturer’s instructions for cleaning wheels, pickups and mechanisms.
Do not immerse a motorised locomotive in water or cleaning solvent.
That shouldn’t need saying.
But somewhere, someday, someone will.
Storage
For long-term storage, keep the model:
- dry;
- away from excessive heat;
- away from sustained direct sunlight;
- protected from crushing;
- and supported in a way that does not put pressure on fine details.
If storing a locomotive in foam, ensure that the foam is not constantly pressing against:
- handrails;
- pipework;
- brake gear;
- lamp irons;
- or other delicate details.
Support the main body instead.
What If I Break Something?
First of all:
don’t panic.
The advantage of resin is that clean breaks are often surprisingly easy to repair.
If you accidentally snap a pipe, lever, step or other component:
- find the broken piece;
- resist the temptation to trim everything immediately;
- test-fit it;
- apply a very small amount of CA;
- hold the component in alignment;
- allow the adhesive to cure;
- lightly finish the joint if necessary;
- repaint the repaired area.
Once painted, many repairs become virtually invisible.
Brass Wire Is Your Friend
For frequently handled components such as:
- handrails;
- grab rails;
- pipework;
- operating levers;
- and certain structural details,
some experienced modellers may choose to replace particularly fine printed details with brass or nickel-silver wire.
This isn’t compulsory.
It is simply another technique available if you are heavily modifying the model.
A small drilled hole and a piece of brass wire can create an exceptionally strong replacement for a delicate fitting.
What If My Model Arrives Damaged?
Please photograph the model and the packaging before attempting substantial repairs.
Postal systems occasionally manage to achieve things with parcels that would impress a structural engineer.
If something appears to have been damaged during transport, contact Shoreleave Models and send us clear photographs showing:
- the overall model;
- the damaged area;
- the broken component if present;
- and, where relevant, the packaging.
Please give us the opportunity to assess genuine transport or manufacturing damage before carrying out major modifications.
What Should a Properly Processed Model Look Like?
A properly washed and cured resin model should have a clean, dry surface.
The surface may vary slightly depending upon model geometry and printing orientation.
You may see:
- tiny support witness marks;
- extremely fine layer lines under magnification;
- slight differences in surface sheen;
- or small areas requiring conventional modelling preparation.
These are normal characteristics of high-resolution additive manufacturing.
What you should not normally encounter is a model covered in obvious wet liquid resin.
If a model appears unusually wet, oily, persistently sticky or otherwise clearly abnormal, stop working on it and contact us.
Do not simply start sanding an unknown sticky surface.
Resin Models Are Not Toys
Shoreleave Models products are scale models intended for adult model makers and collectors.
They can contain very small parts and delicate projections.
They are not designed as children’s toys.
Small components may present a choking hazard and broken resin components can develop sharp edges.
Please keep models, loose components, modelling tools, adhesives, paints and associated materials away from young children.
A Word About Uncured Resin
Customers buying a completed Shoreleave resin model should not normally encounter liquid printing resin at all.
However, it is worth understanding why our production process is so thorough.
Liquid photopolymer resin is not something that should be casually handled with bare hands.
NIOSH guidance identifies uncured resin as a potential source of skin irritation and sensitisation, and appropriate gloves, ventilation and other controls are recommended during resin-printing operations.
IPA also requires appropriate handling because it is a volatile and highly flammable solvent.
That is why the washing, cleaning and UV-curing stages are carried out as part of our production process rather than being left for the customer to complete.
Our Philosophy
A resin model should arrive ready for you to enjoy the part of modelling that actually matters.
Building it.
Painting it.
Weathering it.
Modifying it.
Motorising it.
Putting it on a layout.
And, occasionally, staring at it for half an hour while trying to decide whether the cab should be green or blue.
We carry out the unpleasant part of resin production before the model reaches you.
That means dealing with the freshly printed components, the liquid resin, the IPA cleaning stages, drying, UV post-curing, support removal, inspection and preparation.
By the time your Shoreleave model reaches your workbench, it has already travelled a long way from the vat of liquid resin in which it began.
All we ask is that you remember that high-resolution resin makes it possible to reproduce details that are extraordinarily small.
Those details deserve a little care.
The Shoreleave Resin Model Golden Rules
If you remember nothing else from this page, remember these:
Your model is already washed and UV post-cured.
You do not need to repeat the full resin-printing post-processing procedure.
Hold the model by substantial parts of the body rather than fine details.
A tiny brake lever is a detail, not a carrying handle.
Don’t soak the finished model in IPA unnecessarily.
We have already done the IPA washing.
Use CA/superglue or epoxy for assembly rather than conventional polystyrene cement.
Resin isn’t conventional injection-moulded polystyrene.
Sand gently.
Fine resin is extremely easy to work.
Control sanding and drilling dust.
Wet sanding is particularly useful.
Prime before painting.
Several light coats are much better than one enormous coat.
Avoid excessive heat and prolonged direct sunlight.
Treat the finished model like the precision scale model it is.
Don’t force chassis, screws or fittings.
File, drill, test, adjust and try again.
If something looks genuinely wrong when the model arrives, contact us before trying to fix it.
And finally:
Have fun with it.
Once it leaves Shoreleave Models, it’s your locomotive, your wagon, your machine and your railway.
Paint it pristine.
Cover it in rust.
Add a different chassis.
Change the cab.
Replace the handrails.
Make it look as though it has spent sixty years being abused in a Welsh slate quarry.
Or give it the immaculate works finish that the real thing probably enjoyed for approximately three days.
That’s the part we love seeing.
A grey resin model leaving our workshop is only the beginning.
The best bit is seeing what you turn it into.